"Data Source" category
The "Data Source" group in the "Excel Import" dialog is displayed differently depending on the Excel data driver set.
The following Excel data drivers are supported in FACTON:
- Excel Interop driver
- OLE DB CSV driver / OLE DB Excel driver
- Excel Interop text driver
- Infragistics Excel driver
Excel Interop driver
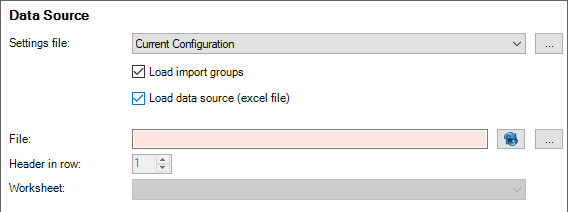
Figure: Excel Import Dialog, Data Source with Excel Interop driver
-
"Settings file" combobox
Click the button to load a new settings file.
-
"Last Configuration from Auto Saving" entry
The most recently used settings are assumed.
-
"Current Configuration" entry
The current settings are used.
-
Selecting the most recently used opt-file:
Activates the use of the most recently opt-file.
-
-
"Settings file" selection button
 :
:Click on this button to select an opt-file for the Excel import settings. The file path is shown next to the button.
-
"Load import groups" checkbox
When the checkbox is activated, the import groups are also loaded when selecting an opt-file.
-
"Load data source (Excel file)" checkbox
When the checkbox is activated, the data source (Excel file) is also loaded when selecting an opt-file.
-
"Refresh" button

Click this button to reload the Excel file, if it has been opened and changed in the meantime.
-
"File" selection button
Click this button to select the Excel or CSV file for the import. The file path is shown next to the button.
-
"Header row in row" combobox
Select the row in which the header row of your Excel spreadsheet is located to accept the Excel data descriptions in FACTON.
-
"Worksheet" combobox
Select the worksheet from the Excel file that contains the data you wish to import. This combobox only applies to Excel files.
OLE DB CSV driver / OLE DB Excel driver
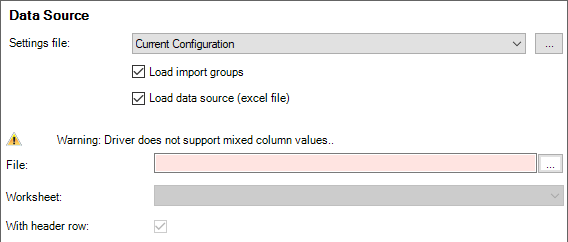
Figure: Excel Import Dialog, Data Source with OLE DB CSV driver / OLE DB Excel driver
-
"Settings file" combobox
Click the button to load a new settings file.
-
"Last Configuration from Auto Saving" entry
The most recently used settings are assumed.
-
"Current Configuration" entry
The current settings are used.
-
Selecting the most recently used opt-file
Activates the use of the most recently opt-file.
-
-
"Settings file" selection button
Click on this button to select an opt-file for the Excel import settings. The file path is shown next to the button.
-
"Load import groups" checkbox
When the checkbox is activated, the import groups are also loaded when selecting an opt-file.
-
"Load data source (Excel file)" checkbox
When the checkbox is activated, the data source (Excel file) is also loaded when selecting an opt-file.
-
"File" selection button
Click this button to select the Excel or CSV file for the import. The file path is shown next to the button.
-
"Worksheet" combobox
Select the worksheet from the Excel file that contains the data you wish to import. This combobox only applies to Excel files.
-
"With header row" checkbox
Activate this checkbox if the first row of the Excel worksheet contains a header row with the definition of the column names that you wish to accept.
Excel Interop text driver
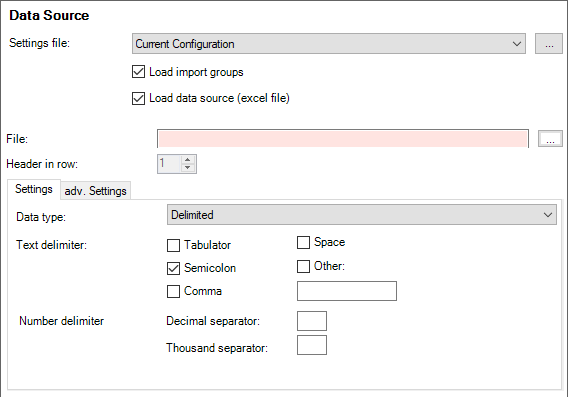
Figure: Excel Import Dialog - Data source with Excel Interop driver - Settings tab
-
"Settings file" combobox
Click the button to load a new settings file.
-
"Last Configuration from Auto Saving" entry
The most recently used settings are assumed.
-
"Current Configuration" entry
The current settings are used.
-
Selecting the most recently used opt-file
Activates the use of the most recently opt-file.
-
-
"Settings file" selection button
Click on this button to select an opt-file for the Excel import settings. The file path is shown next to the button.
-
"Load import groups" checkbox
When the checkbox is activated, the import groups are also loaded when selecting an opt-file.
-
"Load data source (Excel file)" checkbox
When the checkbox is activated, the data source (Excel file) is also loaded when selecting an opt-file.
-
"File" selection button
Click this button to select the Excel or CSV file for the import. The file path is shown next to the button.
-
"Header row in row" combobox
Select the row in which the header row of your Excel spreadsheet is located to accept the Excel data descriptions in FACTON.
"Settings" tab
Define the settings for data structuring on this tab.
-
"Data type" combobox
Shows the data type that can be used to describe content.
-
"Text delimiter"
Activate the checkbox for the separator you wish to use to separate the contents of the Excel file. The text delimiters "Tabulator", "Semicolon", "Comma" and "Space" are available.
If you wish to use a different separator, enter the delimiter of the "Other" input field.
-
"Number delimiter"
-
"Decimal separator" input field
Enter the format for the decimal symbol in the input field.
-
"Thousands separator" input field
Enter the format for the thousands separator in the input field.
Example1.000.00,00 (DE) or 1,000,00.00 (EN)
-
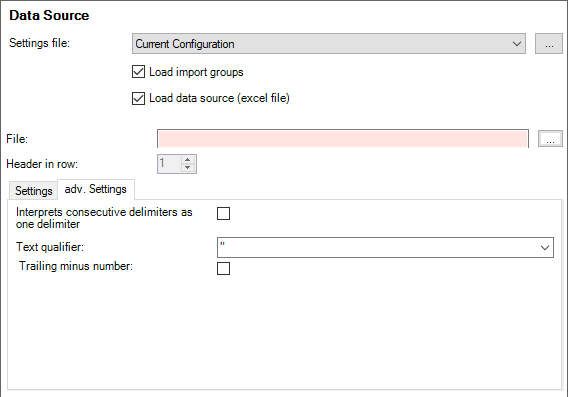
Figure: Excel Import Dialog - Data source with Excel Interop driver - Advanced Settings tab
"Advanced Settings" tab
The tab allows you to define additional options for structuring data in order to describe the data in more detail.
-
"Interprets consecutive delimiters as one delimiter" checkbox
If this checkbox is activated, multiple consecutive separators are interpreted as a single separator. (For example, when a text contains multiple spaces).
-
"Text qualifier" combobox
Define the text qualifier used. The Excel import recognizes numbers that are surrounded by the defined text qualifier as text, e.g. material numbers: "0012530"
-
"Trailing minus number" checkbox
If this box is checked, the Excel import identifies numbers with a trailing minus sign as numbers. If the box is not checked, the Excel import identifies these numbers as text.
Open data sources
- Open an "Excel Import" dialog.
- The driver settings are selected.
- In the "Excel Import" dialog, click on Data Source.
The "Data Source" category opens.
- Click on next to the "File" input field.
The "Open" dialog opens.
- Select the Excel file.
- Confirm your selection with Open.
The file opens.
- Click Accept to apply these data source settings for the import.
The "Data Source" category in the "Excel Import" dialog differs depending on the selected Excel driver.
For more information on driver settings, see "System Settings" category.
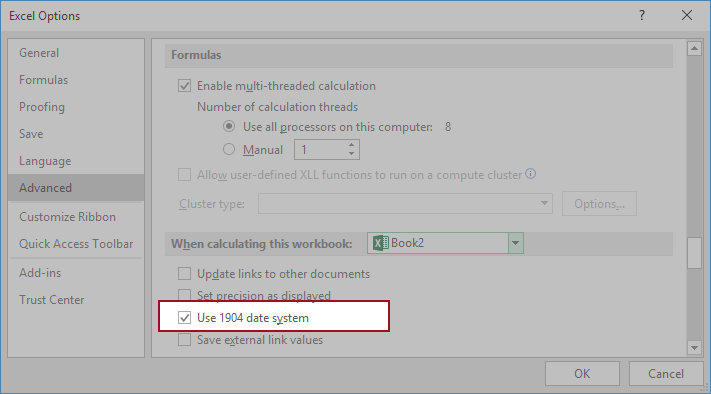
Figure: Microsoft Excel - Excel Options dialog
FACTON cannot correctly interpret dates if the Use 1904 date system box is checked in Excel files. In this case, date entries from imported Excel files will be interpreted incorrectly.
Infragistics Excel driver
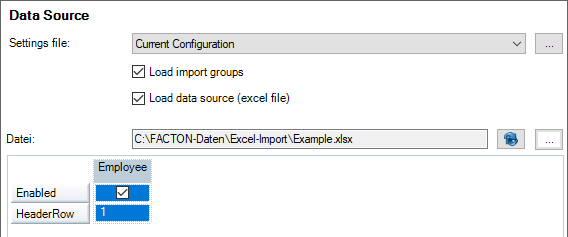
Figure: Excel Import Dialog, Data Source with Infragistics Excel driver
-
"Settings file" combobox
Click the button to load a new settings file.
-
"Last Configuration from Auto Saving" entry
The most recently used settings are assumed.
-
"Current Configuration" entry
The current settings are used.
-
Selecting the most recently used opt-file:
Activates the use of the most recently opt-file.
-
-
"Settings file" selection button
Click on this button to select an opt-file for the Excel import settings. The file path is shown next to the button.
-
"Load import groups" checkbox
When the checkbox is activated, the import groups are also loaded when selecting an opt-file.
-
"Load data source (Excel file)" checkbox
When the checkbox is activated, the data source (Excel file) is also loaded when selecting an opt-file.
-
"Refresh" button
Click this button to reload the Excel file, if it has been opened and changed in the meantime.
-
"File" selection button
Click this button to select the Excel or CSV file for the import. The file path is shown next to the button.